Just testing the Share on Mastodon WordPress plugin by @janboddez@indieweb.social with a bunch of pictures of beautiful bees I took over the years.
#Bees #Photography


Web Developer based in Lorca, España
Just testing the Share on Mastodon WordPress plugin by @janboddez@indieweb.social with a bunch of pictures of beautiful bees I took over the years.
#Bees #Photography


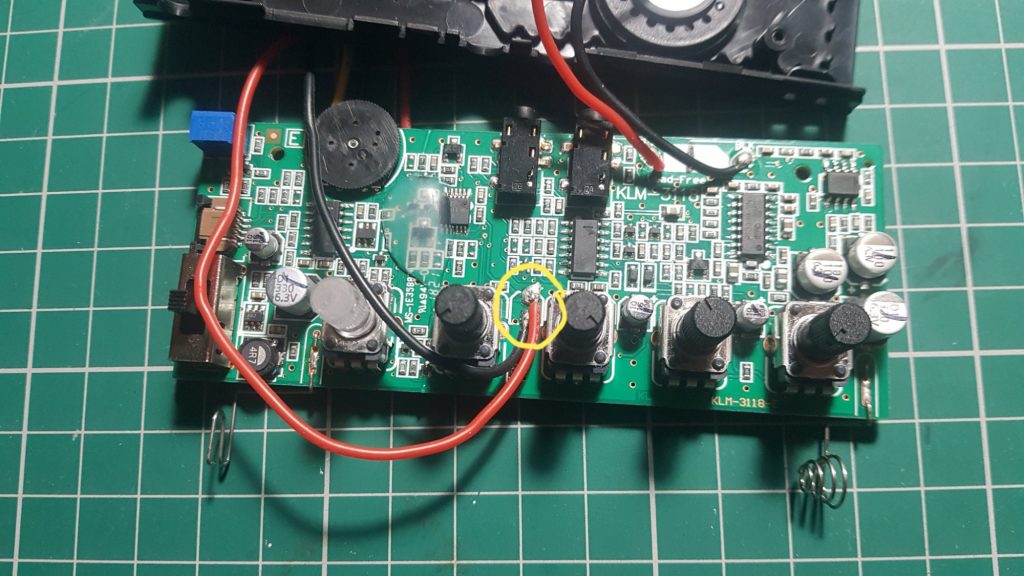
I made a first attempt at adding CV in and an external power supply to a Korg Monotron Delay:
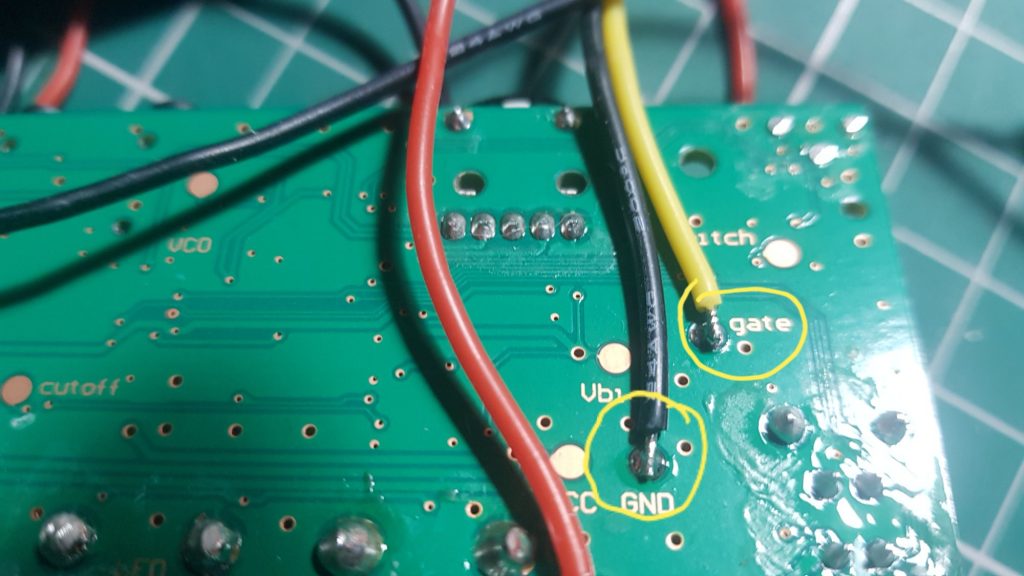
For the power I simply used an external power bank and connected 5V and GND to the respective pins on the Monotron.

The 5V CV signal from the Korg SQ-1 goes into the gate pad on the Monotron. It kind of works, but tuning is quite tempera(ture)mental.

Apart from temperature the pitch is directly dependent on the Monotron’s supply voltage, so I would either need to step down the USB voltage to ~3V and make use of the boost converter that is built into the Monotron to get 5V, or use a higher voltage power supply and regulate it down. Any idea what’s better?🤔
This weekend I had a break from Pico experiments and instead explored alternative ways to listen to Neil Young post his Spotify exodus. Got my Raspberry_Pi Zero W, Waveshare 7″ touch display and Pimoroni pHAT DAC running beautifully with the open source Moode audio player.
This evening I had some fun with @diyelectromusic‘s SimpleMIDIDecoder MicroPython library and the TM1638 LED&KEY module. The display shows MIDI channel and note number and the LEDs light up depending on velocity.
This is running on the Raspberry Pi Pico and also requires mcauser’s TM1638 library.
Here’s the (slightly rushed) code:
| # MIDI note visualiser for Raspberry Pi Pico and TM1638 LED&KEY module by @AxWax | |
| # | |
| # Demo: https://twitter.com/AxWax/status/1480659594342899713 | |
| # | |
| # This is heavily based on and requires | |
| # the SimpleMIDIDecoder library by @diyelectromusic, which can be found at | |
| # https://diyelectromusic.wordpress.com/2021/06/13/raspberry-pi-pico-midi-channel-router/ | |
| # as well as the MicroPython TM1638 LED Driver library by mcauser from | |
| # https://github.com/mcauser/micropython-tm1638 | |
| # | |
| # Wiring: | |
| # serial midi input on GP1 (UART0 RX) | |
| # TM1638 Pico | |
| # VCC 3v3 | |
| # GND GND | |
| # STB GP4 | |
| # CLK GP3 | |
| # DIO GP2 | |
| import machine | |
| import time | |
| import ustruct | |
| import SimpleMIDIDecoder | |
| from time import sleep_ms | |
| from machine import Pin | |
| import tm1638 | |
| # Initialise the LED & Key | |
| tm = tm1638.TM1638(stb=Pin(4), clk=Pin(3), dio=Pin(2)) | |
| # Initialise the serial MIDI handling | |
| uart = machine.UART(0,31250) | |
| # MIDI callback routines | |
| def doMidiNoteOn(ch, cmd, note, vel): | |
| tm.show("C."+str(ch)+" N."+str(note)+" ") | |
| if vel == 0: | |
| tm.leds(0b00000000) | |
| elif vel <= 16: | |
| tm.leds(0b00000001) | |
| elif vel <= 32: | |
| tm.leds(0b00000011) | |
| elif vel <= 48: | |
| tm.leds(0b00000111) | |
| elif vel <= 64: | |
| tm.leds(0b00001111) | |
| elif vel <= 80: | |
| tm.leds(0b00011111) | |
| elif vel <= 96: | |
| tm.leds(0b00111111) | |
| elif vel <= 112: | |
| tm.leds(0b01111111) | |
| else: | |
| tm.leds(0b11111111) | |
| uart.write(ustruct.pack("bbb",cmd+ch-1,note,vel)) | |
| def doMidiNoteOff(ch, cmd, note, vel): | |
| tm.leds(0b00000000) | |
| tm.show("C."+str(ch)+" N."+str(note)+" ") | |
| uart.write(ustruct.pack("bbb",cmd+ch-1,note,vel)) | |
| def doMidiThru(ch, cmd, d1, d2): | |
| if (d2 == -1): | |
| uart.write(ustruct.pack("bb",cmd+ch,d1)) | |
| else: | |
| uart.write(ustruct.pack("bbb",cmd+ch,d1,d2)) | |
| md = SimpleMIDIDecoder.SimpleMIDIDecoder() | |
| md.cbNoteOn (doMidiNoteOn) | |
| md.cbNoteOff (doMidiNoteOff) | |
| md.cbThru (doMidiThru) | |
| # the loop | |
| while True: | |
| # Check for MIDI messages | |
| if (uart.any()): | |
| md.read(uart.read(1)[0]) |
I spent longer than I care to admit on failing to get either a TM1638 LED, an SH1106 OLED or a 1602 LCD to work with my Pico. Turns out one of my jumper wires had an intermittent fault 🤦
After a wire transplant everyone is finally happy!
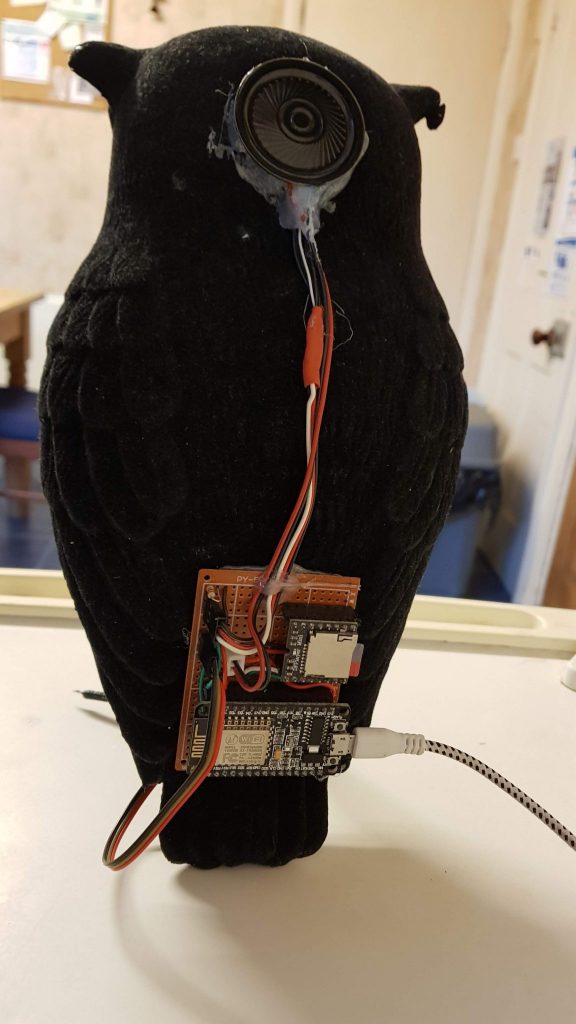
Kevin started his life when my then flatmate found him in a bargain bin for 25p. Once the inbuilt button cell battery had depleted she let me have a play with it.
I removed the battery holder, rewired the eye LEDs, built a circuit board consisting of an ESP8266 and a DFPlayer Mini MP3 Player and hot-glued a speaker where the battery holder used to be.

Initially I simply hooked him up to our doorbell, whose 433MHz signal gets converted into MQTT messages through Sonoff’s RFBridge running the excellent Espurna firmware: